PythonでPepperコントローラーを作成
こんにちは。
AI coordinatorの清水秀樹です。
Pepperを簡単に動かせるPepper用コントローラーをPythonで作成してみましょう。
必要な環境構築は以下の記事を参考にしてください。
Pepper用Python2.7 SDK(WIN)セットアップ方法
Pepper用Python2.7 SDK(MAC)セットアップ方法
今回はPython GUIが簡単に作成できるTkinterを使って、Pepper用コントローラーを作成してみましょう
以下の機能を実装しています。
- Pepperへの接続ボタン
- 台詞を喋らせるためのテキストボックスとボタン
- 移動上の十字ボタン(へぼいのでご容赦ください)
- 時刻取得ボタン
- ニュース取得ボタン
完成後のGUIはこんな感じです。

使い方は簡単です。
初めにPepper IP と、ポート番号を入力して接続ボタンを押すだけです。
あとはご自由に使ってみてください。
自分で作成するのがめんどくさい人は、直接こちらからソースコードをダウンロードしてください。
peppe-controllerr.zip
ソースコードの説明
特に難しいことはありません。
def __init__(self):でGUIを作成し、あとはボタンを押すたびに動く関数を作成しているだけです。
入力ボックスには予めデフォルトで値を表示させています。
もちろん入力値の変更は可能です。
ソース頭に定義してある各モジュールは、必要に応じてpipでインストールしてください。
実行時にモジュールが無いというようなエラーが出る場合はインストールが必要です。
from Tkinter import*
from naoqi import ALProxy
import time
import feedparser

class myclass():

    def __init__(self):

        #ウインドウ定義----------------------------------------
        root = Tk()
        root.option_add('*font', 'FixedSys 18')
        root.option_add('*Button.background', 'green')
        root.geometry("700x300")
        root.title(u"Pepper Controller")

        #IPアドレス取得テキストボックス & ボタン------------
        Label(text=u'Pepper IP ⇒').place(x=25,y=10)
        self.ip = Entry(width=15)
        self.ip.place(x=130,y=10)
        self.ip.insert(0,"localhost")

        Label(text=u'ポート').place(x=260,y=10)
        self.port = Entry(width=5)
        self.port.place(x=315,y=10)
        self.port.insert(0,58966)

        Button(root,text = "接続",command=self.ip_btn).place(x=370,y=6)

        #台詞用テキストボックス & ボタン--------------------
        Label(text=u'台詞を入力').place(x=25,y=60)
        self.say = Entry(width=50)
        self.say.place(x=130,y=60)
        self.say.insert(0,"こんにちは")
        Button(root,text = "話す",command=self.say_btn).place(x=550,y=55)

        #移動ボタン--------------------------------------------
        Label(text=u'十字ボタン').place(x=25,y=140)
        self.move = Entry(width=3)
        self.move.place(x=167,y=145)
        self.move.insert(0,0.5)
        Button(root,text = "↑",command=self.Advance).place(x=170,y=110)
        Button(root,text = "↓",command=self.Recession).place(x=170,y=170)
        Button(root,text = "←",command=self.left).place(x=130,y=140)
        Button(root,text = "→",command=self.right).place(x=200,y=140)

        #時間の取得ボタン--------------------------------------
        Button(root,text = "時刻",command=self.time_btn).place(x=250,y=170)
        Button(root,text = "ニュース",command=self.news_btn).place(x=320,y=170)

        root.mainloop()

    def ip_btn(self):
        #ipアドレスを取得する
        ip = self.ip.get()
        port = int(self.port.get())
        self.tts = ALProxy('ALTextToSpeech',ip,port)
        self.motion = ALProxy("ALMotion", ip, port)

    def say_btn(self):
        #台詞の取得と実行
        say = self.say.get()
        self.tts.say(say.encode('utf8'))

    def Advance(self):
        #前進
        move = float(self.move.get())
        self.motion.moveTo(move, 0.0, 0.0)

    def Recession(self):
        #後退
        move = float(self.move.get())
        self.motion.moveTo(-move, 0.0, 0.0)

    def left(self):
        #左移動
        move = float(self.move.get())
        self.motion.moveTo(0.0, move, 0.0)

    def right(self):
        #右移動
        move = float(self.move.get())
        self.motion.moveTo(0.0, -move, 0.0)

    def time_btn(self):
        #時間の取得
        self.tts.say(str(time.strftime("%H") + "時" + time.strftime("%M") + "分" + "です"))

    def news_btn(self):
        #ニュースの取得
        url = "http://www3.nhk.or.jp/rss/news/cat0.xml"
        rss = feedparser.parse(url)
        for entry in rss['entries']:
            self.tts.say(entry['description'].encode('utf8'))
            break

myclass()
もっといいソースの記載方法があればご教授頂けるとうれしいです。
実行してみましょう
適当なボタンを押して、Pepperが反応すれば成功です。
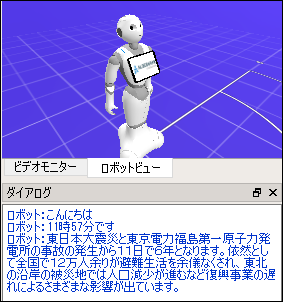
今回はバーチャルペッパーで実行していますが、おそらく実機でも動くはずです。
ぜひお試しあれ。
それではまた。

LEAVE A REPLY