Let’s play with AI.
こんにちは。
AI coordinator管理人の清水秀樹です。
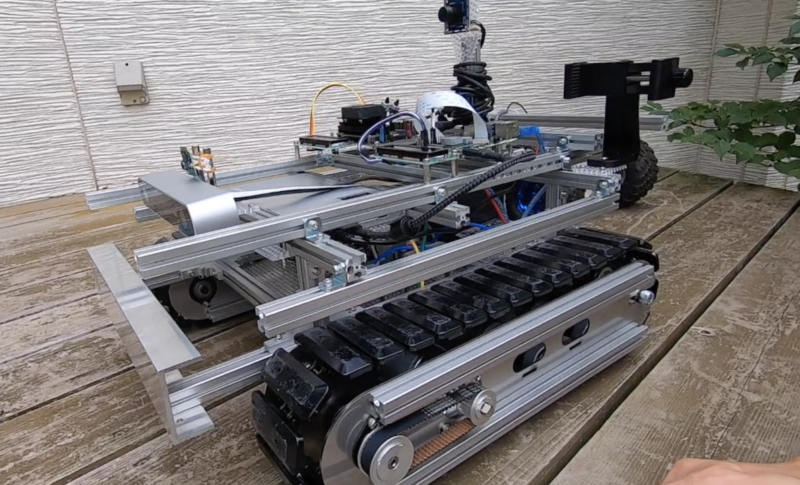
今回は外でも動く遠隔操作AIロボットを作ろうpart01:土台作成編に続き、part2:arduino編です。
part01を見ていない方はこちらの動画でご確認頂けます。
今回ご紹介するarudino編も動画にしていますので、参考にしてみてください。
arduinoでタイヤを動かしてみよう。
arduino IDEのセットアップ方法は以下のページで紹介しています。
ArduinoでDCモーター/サーボモーターを動かしてみよう!
arduino IDEのセットアップが完了したら早速下記ソースコードを書き込みましょう。
/*
 * This example shows how to control MDDS30 in Serial Simplified mode with Arduino.
 * Set MDDS30 input mode to 0b11001100
 * Open Serial Monitor, set baudrate to 9600bps and "No line ending".
 * Send 0: Left motor stops
 *      1: Left motor rotates CW with half speed
 *      2: Left motor rotates CW with full speed
 *      3: Left motor rotates CCW with half speed
 *      4: Left motor rotates CCW with full speed
 *      5: Right motor stops
 *      6: Right motor rotates CW with half speed
 *      7: Right motor rotates CW with full speed
 *      8: Right motor rotates CCW with half speed
 *      9: Right motor rotates CCW with full speed
 *
 * Note: This example also compatible with MDDS10 and MDDS60
 *
 * Hardware Connection:
 *   Arduino Uno    MDDS30
 *   GND ---------- GND
 *   4 ------------ IN1
 *
 * Related Products:
 * - SmartDriveDuo-30: http://www.cytron.com.my/P-MDDS60
 * - CT UNO: http://www.cytron.com.my/p-ct-uno
 * - DC Brush Motors: http://www.cytron.com.my/c-84-dc-motor
 * - LiPo Battery: http://www.cytron.com.my/c-87-power/c-97-lipo-rechargeable-battery-and-charger
 * - Male to Male Jumper: https://www.cytron.com.my/p-wr-jw-mm65
 *
 * URL: http://www.cytron.com.my
 */

#include <SoftwareSerial.h>
#include <Cytron_SmartDriveDuo.h>
#define IN1 4 // Arduino pin 4 is connected to MDDS60 pin IN1.
#define BAUDRATE  9600
Cytron_SmartDriveDuo smartDriveDuo30(SERIAL_SIMPLFIED, IN1, BAUDRATE);

char inChar;
signed int speedLeft, speedRight;

void setup()
{
  pinMode(13, OUTPUT);
  Serial.begin(9600);

  digitalWrite(13, HIGH);
  delay(2000); // Delay for 5 seconds.
  digitalWrite(13, LOW);
}

void loop()
{
  if (Serial.available()) {
    //delay(100);

    inChar = (char)Serial.read();
    //int inChar = (char)Serial.parseInt();
    /*String rcvd = Serial.readStringUntil('\n');
    float inChar = rcvd.toFloat();

    Serial.println(inChar);

    digitalWrite(13, LOW);
    speedLeft = inChar * 100;
    */

    if (inChar == '0') {
      digitalWrite(13, LOW);
      speedLeft = 0;
    }
    else if (inChar == '1') {
      digitalWrite(13, HIGH);
      speedLeft = 50;
    }
    else if (inChar == '2') {
      digitalWrite(13, HIGH);
      speedLeft = 100;
    }
    else if (inChar == '3') {
      digitalWrite(13, HIGH);
      speedLeft = -50;
    }
    else if (inChar == '4') {
      digitalWrite(13, HIGH);
      speedLeft = -100;
    }
    else if (inChar == '5') {
      digitalWrite(13, LOW);
      speedRight = 0;
    }
    else if (inChar == '6') {
      digitalWrite(13, HIGH);
      speedRight = 50;
    }
    else if (inChar == '7') {
      digitalWrite(13, HIGH);
      speedRight = 100;
    }
    else if (inChar == '8') {
      digitalWrite(13, HIGH);
      speedRight = -50;
    }
    else if (inChar == '9') {
      digitalWrite(13, HIGH);
      speedRight = -100;
    }


    smartDriveDuo30.control(speedLeft, speedRight);
  }
}GitHubリポジトリにもあります。
arduino IDEのシリアルモニタから数字を打ち込めばタイヤが回転します。
詳細は動画を参照ください。
次回はラズパイからタイヤを動かす内容をご紹介致します。
それではまた!


LEAVE A REPLY