YOLO v2にVGG16を組み合わせて使用してみよう
こんにちは。
AI coordinatorの清水秀樹です。
ある日、閃きました。
YOLO v2の物体検出の精度に、VGG16の画像認識を組み合わせて使用してみたら最強の物体検出ツールが出来上がるのではないかと・・・。
80クラスのクラス分けができるYOLO v2に対し、VGG16は1000種類もの画像認識が可能となっているので、これらを組み合わせれば、より詳細なクラス名を表示できる物体検出機能になると単純に思った訳です。
そんな訳で、早速試してみました。
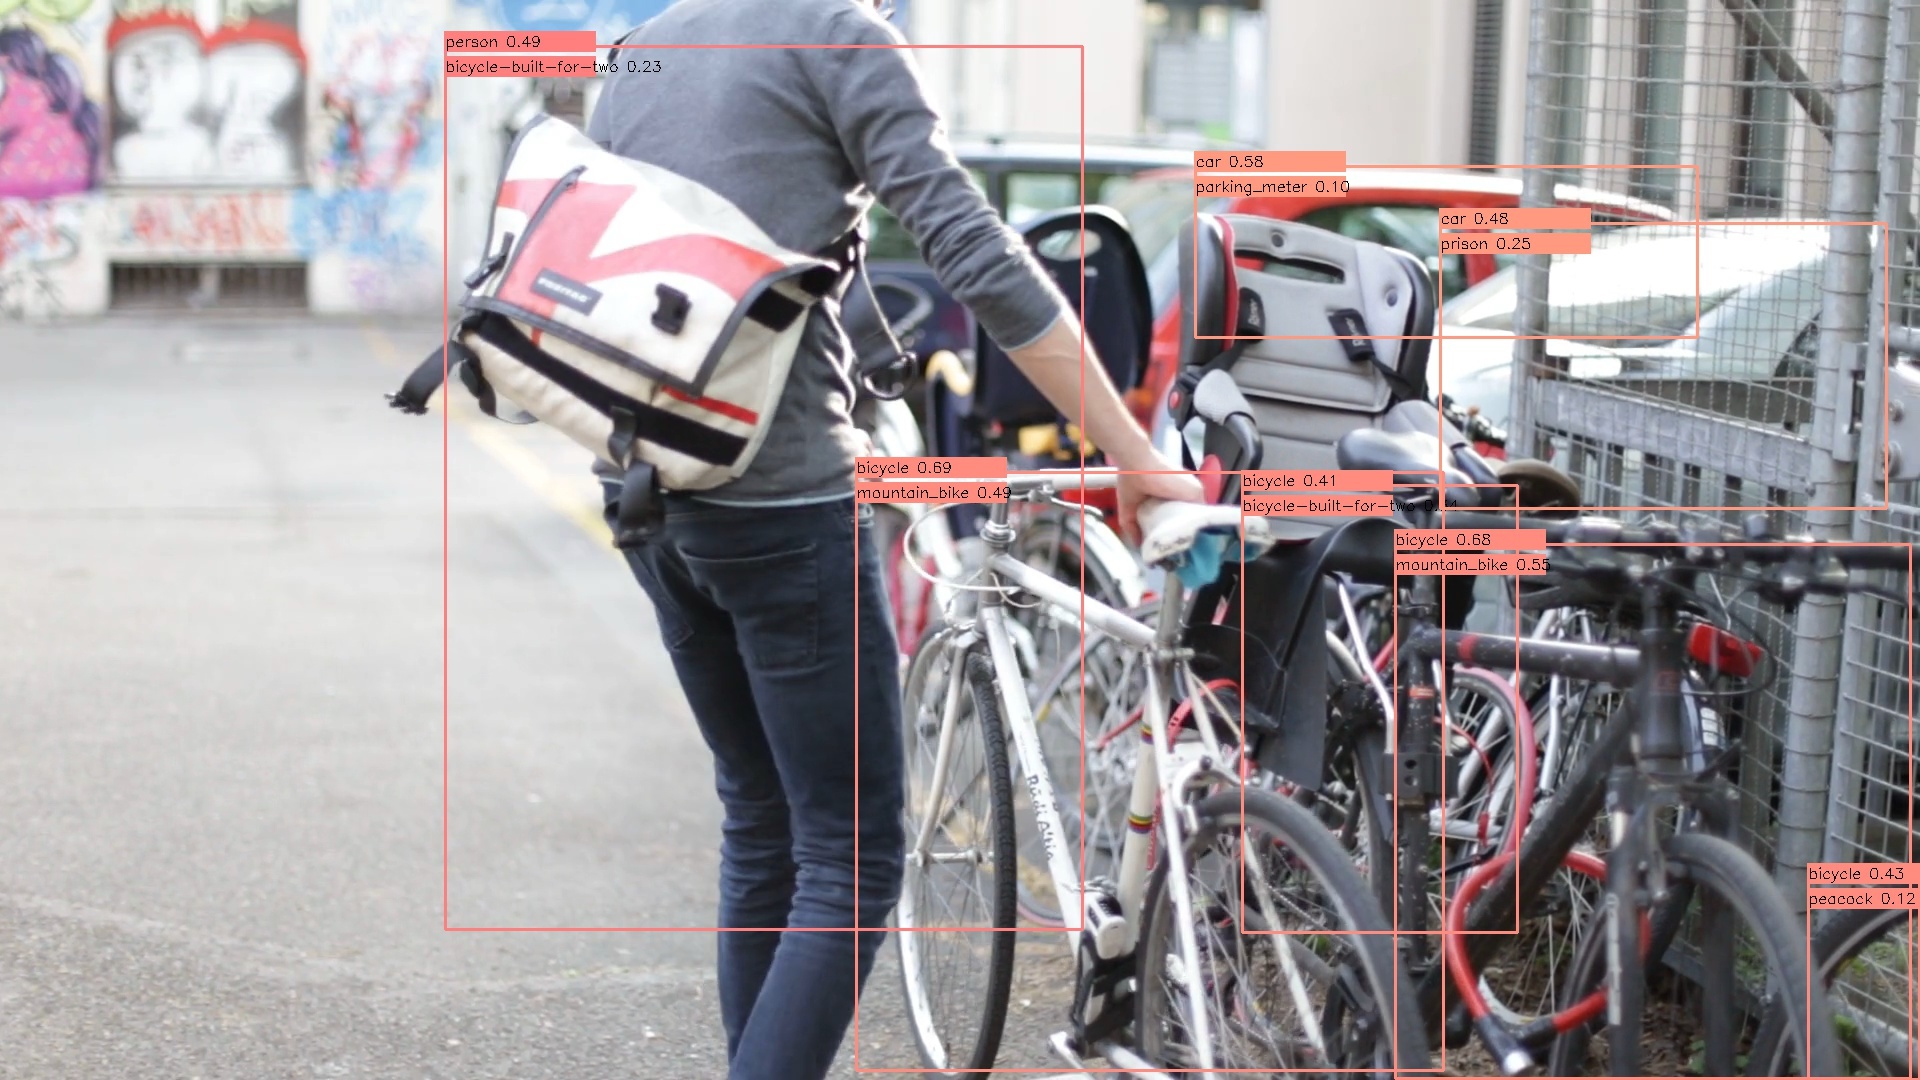
下記動画ではわかりにくいのですが、クラス表示は上段にYOLO v2のクラス名を表示し、下段にVGG16のクラス名を表示しています。
開発環境
macOS Sierra
Anaconda3-4.2.0-MacOSX-x86_64
python 3.5.2
opencv3 3.1.0
tensorflow 1.0.0
YOLO v2のセットアップ方法については以下の記事を参考にしてください。
YOLOv2のリアルタイム物体検出をTensorFlowとPythonで実装する方法
組み合わせの仕組み
組み合わせの仕組みは簡単です。
まずはYOLO v2で物体検出をしてもらいます。
その後、物体検出した画像を切り出し、その画像をVGG16の学習モデルにぶつけてみるだけです。
これにより、より詳細なクラス名を表示できる物体検出ツールが出来上がる仕組みです。
考えてもみれば、使用する学習モデルをたった一つにする必要はないので、複数の学習モデルを組み合わせて使用することで、より詳細な物体検出ができるようになります。
ソースコード
とりあえずサクッと作ってみました。
つい数ヶ月前の筆者のレベルからでは考えられません。
興味があればプログラミングもなんとかできるようになりますね。
from darkflow.net.build import TFNet
import cv2
import numpy as np

from keras.applications.vgg16 import VGG16
from keras.preprocessing import image
from keras.applications.vgg16 import preprocess_input
from keras.applications.vgg16 import decode_predictions
import numpy as np

options = {"model": "cfg/yolo.cfg", "load": "bin/yolo.weights", "threshold": 0.1}
tfnet = TFNet(options)

# カメラの起動
cap = cv2.VideoCapture(0)

class_names = ["person","bicycle","car","motorcycle","airplane","bus","train",
               "truck","boat","traffic light","fire hydrant","stop sign","parking meter",
               "bench","bird","cat","dog","horse","sheep","cow","elephant","bear",
               "zebra","giraffe","backpack","umbrella","handbag","tie","suitcase",
               "frisbee","skis","snowboard","sports ball","kite","baseball bat",
               "baseball glove","skateboard","surfboard","tennis racket","bottle",
               "wine glass","cup","fork","knife","spoon","bowl","banana","apple",
               "sandwich","orange","broccoli","carrot","hot dog","pizza","donut",
               "cake","chair","couch","potted plant","bed","dining table","toilet",
               "tv","laptop","mouse","remote","keyboard","cell phone","microwave",
               "oven","toaster","sink","refrigerator","book","clock","vase","scissors",
               "teddy bear","hair drier","toothbrush"]

num_classes = len(class_names)
class_colors = []
for i in range(0, num_classes):
    hue = 255*i/num_classes
    col = np.zeros((1,1,3)).astype("uint8")
    col[0][0][0] = hue
    col[0][0][1] = 128
    col[0][0][2] = 255
    cvcol = cv2.cvtColor(col, cv2.COLOR_HSV2BGR)
    col = (int(cvcol[0][0][0]), int(cvcol[0][0][1]), int(cvcol[0][0][2]))
    class_colors.append(col)

#-----------------------------------------------------------------------------------------------------
model = VGG16(weights='imagenet', include_top=True)
img_height, img_width = 224, 224


def main():

    while(True):

        # 動画ストリームからフレームを取得
        ret, frame = cap.read()

        #---yolo v2による物体検出-----------------------------------------------------------------
        result = tfnet.return_predict(frame)

        for item in result:
            tlx = item['topleft']['x']
            tly = item['topleft']['y']
            brx = item['bottomright']['x']
            bry = item['bottomright']['y']
            label = item['label']
            conf = item['confidence']

            if conf > 0.4:
                for i in class_names:
                    if label == i:
                        class_num = class_names.index(i)
                        break

                #枠の作成
                cv2.rectangle(frame, (tlx, tly), (brx, bry), class_colors[class_num], 2)

                #ラベルの作成
                text = label + " " + ('%.2f' % conf)
                cv2.rectangle(frame, (tlx-1, tly - 15), (tlx + 150, tly + 5), class_colors[class_num], -1)
                cv2.putText(frame, text, (tlx, tly), cv2.FONT_HERSHEY_SIMPLEX, 0.5, (0,0,0), 1)

                #---vgg16による画像認識--------------------------------------------------------------
                dst = frame[tly:bry, tlx:brx]

                # 画像を読み込んで4次元テンソルへ変換
                img = cv2.resize(dst,(img_height,img_width))
                x = image.img_to_array(img)
                x = np.expand_dims(x, axis=0)
                x = preprocess_input(x)

                features = model.predict(x)
                labels = decode_predictions(features, top=1)[0]

                if labels[0][2] > 0.1:
                    #ラベルの作成
                    text = labels[0][1] + " " + ('%.2f' % labels[0][2])
                    cv2.rectangle(frame, (tlx-1, tly + 10), (tlx + 150, tly + 30), class_colors[class_num], -1)
                    cv2.putText(frame, text, (tlx, tly + 25), cv2.FONT_HERSHEY_SIMPLEX, 0.5, (0,0,0), 1)

        # 表示
        cv2.imshow("Show FLAME Image", frame)

        # escを押したら終了。
        k = cv2.waitKey(1);
        if k == ord('q'):  break;

    cap.release()
    cv2.destroyAllWindows()

if __name__ == '__main__':
    main()
今回はテスト検証なので、確信度が低くてもラベルを表示するようにしています。
この辺りはお好みですね。
割と簡単に実装できますので、興味がある方はぜひチャレンジしみてください。
また、これからDeep Learningの勉強をするなら、こちらで紹介する書籍も参考になりますので一読してみることをオススメします。
それではまた。


LEAVE A REPLY